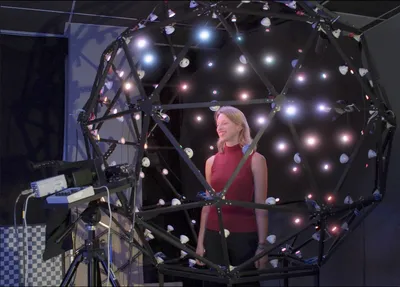
Image-Based Lighting with LED Walls Explained: A Practical Guide for Filmmakers
Image source: LED Walls: Working with the LED Volume for …
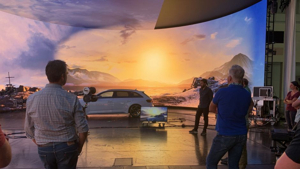
Image source: www.roevisual.com · en · knowledge-and-support[Blog] Get to Grips of Working with LED Volumes | ROE Visual
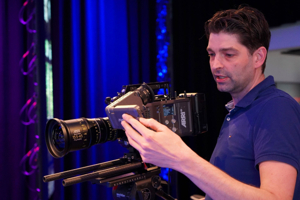
Image source: www.roevisual.com · us-en · news-and-eventsGet to Grips of Working with LED Volumes in Virtual Production
Image-based lighting with LED walls
Image-based lighting (IBL) uses an image of an environment to determine where light comes from, what color it is, and what appears in reflections. On a virtual-production set, an LED wall puts that idea into the physical world: the displayed scene becomes both a camera-visible background and a source of light for actors and props. A surrounding “LED volume” can provide light from more directions than a single flat wall. 1, 2
How it works
A production starts with a filmed environment, a rendered scene, or a high-dynamic-range image (HDRI). In computer graphics, an HDRI can light virtual objects; on set, selected imagery is played across LED panels so its changing colors and bright areas illuminate real objects. For example, a moving sunset background can cast changing warm light onto an actor and appear in a car’s reflections. Additional fixtures can be pixel-mapped—driven by sampled parts of the same image—to extend that lighting beyond what the wall alone can provide. 1, 3
In practice, the wall is doing two jobs at once. It replaces green screen by supplying a visible background, and it acts as a large, shaped light source whose output is already motivated by the scene. A blue sky segment on the wall lifts shadows with cool ambient light, while a warm practical lamp in the image can add a believable color accent to faces and shiny surfaces. The best results come when the foreground is lit to match the apparent direction, intensity, and color contrast of the background rather than treated as a separate lighting setup.
flowchart LR A["Environment image or rendered scene"] --> B["Playback and color calibration"] B --> C["LED wall or volume"] B --> D["Optional pixel-mapped fixtures"] C --> E["Light and reflections on actors and props"] D --> E C --> F["Background seen by camera"] E --> G["Camera records combined shot"] F --> G H["Camera position and lens data"] --> I["Real-time perspective update"] I --> BWhen the camera moves through a 3D virtual environment, tracking and lens data tell the rendering system how to update the wall’s perspective. The area the camera sees—its frustum—can receive the highest-quality rendering, while off-camera panels still contribute useful illumination and reflections. A prerecorded 2D background does not gain correct parallax merely by being displayed on an LED wall. 2
This is why image-based lighting on LED walls is closely tied to virtual production workflow. The imaging pipeline must keep the wall content, the camera perspective, and the physical set in agreement. If a reflected highlight in a chrome car door is supposed to sit under a strip of sunset clouds, the wall must present that bright region in the correct spatial position and at the correct exposure. A misaligned asset may still look attractive on the wall, but it will not read as part of the photographed world.
What makes it different from ordinary set lighting
Traditional lighting starts with fixtures placed in the room and then shapes the scene around those fixtures. LED-wall IBL starts with the image and lets the light fall out of that image. That changes the order of decision-making:
- Color comes from the environment first. A snowy exterior, neon alley, or candlelit room can each push a distinct color bias into skin tones and practical surfaces.
- Reflections become scene-specific. Glass, chrome, and glossy paint can pick up recognizable shapes instead of generic softboxes.
- Light changes with the story beat. A storm cloud, passing headlight, or flickering monitor can be embedded in the displayed image and immediately affect the stage.
The result is especially useful when a scene depends on matching background light to foreground performance. An actor turning toward a virtual window can receive the same cool edge light that the audience sees in the shot, which reduces the mismatch that often appears when background and lighting are built separately.
Why use it?
The main advantage is that the background and foreground interact during the take. Actors receive scene-related color and ambient light, reflective objects show parts of the environment, and the crew can judge much of the combined image in camera rather than waiting for a later composite. The lighting can also change with the imagery—for instance, as clouds pass across a virtual sky. 1, 4
There is also a practical continuity benefit. Because the light source is tied to the rendered environment, changes in weather, time of day, or vehicle motion can be reproduced consistently across takes. For car work, product shots, and controlled interior scenes, that can save a great deal of match work in post because the photographed reflections, highlights, and background plates are already aligned.
Where it falls short
An LED wall is not a complete replacement for film lights. It is well suited to broad, soft ambience and reflections, but a bright virtual sun may need a separate fixture to produce a convincing hard shadow. Lighting skin solely with RGB panels can also yield unwanted color, so productions test and supplement the light on real subjects. 2
The system must be calibrated and synchronized as a whole: image color, LED output, camera exposure, tracking, and playback all affect the result. Poor synchronization can cause visible artifacts; pixel structure can cause moiré; and highly reflective props may reveal gaps in the wall or individual LEDs. The practical goal is therefore not “make the screen as bright as possible,” but make the photographed background, light, and reflections agree. 2, 4
A few practical limitations come up again and again:
- Specular detail can break the illusion. Small, glossy objects may show panel seams, scanlines, or the physical edge of the volume.
- The wall’s apparent brightness is limited by camera settings. If the camera is stopped down too far or the wall is underpowered, the image may look flat and the lighting may feel disconnected.
- Off-camera content still matters. The visible frame may look correct while the surrounding panels fail to provide enough wrap or reflection for nearby surfaces.
- Color management is critical. The wall must be profiled so the displayed image behaves predictably under the camera’s sensor response and the chosen white balance.
Practical workflow
A solid IBL workflow on LED volume work usually follows the same sequence:
- Build or capture the environment image. That may be an HDRI, a stitched plate, a rendered sky, or a full virtual set.
- Decide what portion must be visible in camera. The framed area needs the cleanest perspective and the most accurate texture detail.
- Match exposure and contrast. The bright regions of the wall should support the desired key and edge light without clipping in the camera.
- Place real fixtures only where needed. Hard sources, eye lights, or strong motivated shadows are often easier to create with dedicated lamps.
- Check reflections early. Chrome, glass, black lacquer, and automotive paint reveal mistakes faster than matte surfaces.
- Verify tracking and movement. Even small errors in camera position can make horizon lines, building edges, or reflected highlights drift.
A useful mindset is to treat the wall as a lighting instrument, not just a background display. The image should be composed with the same care given to a practical lighting setup: where the brightest area sits, how the color rolls off into shadow, and how much detail should be held in the highlights all matter to the final shot.
Common mistakes
The most common mistake is lighting the set as though the wall were invisible. If the image shows a bright overcast sky but the actor is lit like a three-point interview, the shot will feel disconnected even when the wall is technically correct.
Other frequent problems include:
- Using a 2D plate for a scene that needs parallax. The wall can display the image, but it cannot invent depth the source does not contain.
- Ignoring reflective blocking. A camera move that looks clean on matte walls may reveal the crew, seams, or unused panels in reflective surfaces.
- Over-relying on saturation. Highly saturated wall content can push skin into unnatural color if it is not balanced with neutral fill.
- Forgetting the off-camera light. The visible background may sell the scene while the surrounding spill remains too weak to affect nearby objects.
When LED-wall IBL is strongest
Image-based lighting on LED walls is most effective when the scene depends on believable environment light, controlled camera movement, and reflective interaction between background and foreground. It is especially strong for:
- vehicle interiors and driving scenes,
- window views in interior sets,
- stylized dialogue scenes with strong motivated color,
- product work with glossy or metallic surfaces,
- virtual environments where the background itself is part of the lighting design.
The method is less persuasive when the shot needs a very hard, distant sun, wide uncontrolled movement, or a highly reflective setup that would expose the physical limits of the wall. In those cases, the wall still helps, but it works best as one part of a larger lighting plan rather than the entire solution.