
Lighting Exterior Daylight Scenes: How to Control and Shape Sunlight
Image source: Natural Light Cinematography Guide | BOLD University

Image source: Shot Craft: Follow the Sun
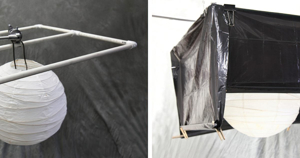
Image source: Handy Do-It-Yourself… - The American Society of Cinematographers
Lighting an exterior daylight scene: managing the sun
The most effective way to light a daylight exterior is to plan around the sun before adding equipment. Decide where it should appear relative to the actors, schedule shots for the angle you want, then use shade, bounce, diffusion, and negative fill to refine what reaches their faces. The challenge is keeping that look consistent while the sun and clouds change. 1, 2
Plan the scene
Scout the location at the time you intend to shoot. Check the sun’s path, where buildings or trees cast shade, and whether the blocking lets you keep the sun behind or to one side of the actors. Backlight is often useful: it separates a subject from the background and avoids having them face directly into bright sun. It is a choice, not a rule—the scene and camera angles come first. 1, 2
Scheduling should follow the light, not fight it. A scene that cuts from a wide shot in open sun to a close-up in shade can feel disconnected unless the contrast direction, shadow density, and background brightness are all deliberately matched. Many crews build daylight scenes by grouping setups into “sun” and “shade” passes so the overall look stays coherent from shot to shot.
Wide shots usually reveal the most about the sun’s position because they include background, horizon line, and shadow direction in one frame. Midday’s high sun can produce pronounced shadows around eyes and under chins; it may be easier to shoot closer coverage then, when you can place diffusion over a smaller area. Open shade is another option if you need softer light without rigging a large frame. 1, 3
Read the scene before adding gear
A useful rule on exterior days is to solve the big shape first and the small shape second. The big shape is where the sun lives in the frame: front light, side light, backlight, or full shade. The small shape is how the face is modeled after that decision. If the sun angle is wrong for the scene, no amount of bounce will fix the basic feel of the image.
That is why many daylight setups start with a simple question: does the sun belong in the shot, or should it be hidden? If the answer is hidden, the actor can be moved a few feet into shade, or the camera can be shifted so a tree line, wall, or building edge blocks the direct rays. If the answer is visible, the exposure strategy has to account for the hotter background and the higher contrast it creates around the subject.
Shape the light
| What you see | What to try |
|---|---|
| The face is too dark against a backlit background | Bounce a modest amount of daylight onto it with a white card or reflector. Keep some shadow so the fill does not look pasted on. 3, 2 |
| Direct sun makes the close-up harsh | Put diffusion between the sun and the actor. Check the frame’s edges and the background: the softened subject may now look darker than the still-sunlit surroundings. 1, 2 |
| The face looks flat in open shade or overcast light | Place a black flag or fabric near the camera-side shadow of the face to subtract ambient fill and restore shape. 2 |
| The sun keeps entering the shot or changing the lighting | Rework the camera position or blocking, move into stable shade, or adjust flags as it moves. 1, 2 |
A simple starting setup is an actor with the sun behind them, a white bounce off-camera to lift the face, and a black flag on the opposite side if the ambient fill makes it too even. Adjust the bounce by looking at the face and the background together, rather than trying to make both equally bright. 1, 2, 3
Bounce, diffusion, and negative fill
These three tools do different jobs, and they are easiest to use when their purpose stays separate.
- Bounce adds light back into the face. A white surface gives a softer lift; a silver surface gives a stronger, more specular return. The more efficient the bounce, the more likely it is to look like a deliberate fill source rather than ambient daylight.
- Diffusion reduces the hardness of direct sun. It does not magically make a scene “soft”; it simply turns a small, hard source into a larger, softer one from the subject’s point of view.
- Negative fill removes unwanted ambient light. In open shade, under trees, or next to pale ground and walls, the face can become too flat. A black surface near the shadow side restores contour by preventing light from bouncing back in.
The common mistake is using all three at once without a clear order of operations. If the sunlight is still hitting the face directly, negative fill will not solve the harshness. If the face is already in good shade, adding bounce may only erase the shape that made the image work in the first place.
Match the fill to the background
Exterior daylight often fails when the face and the world around it belong to different exposure levels. A face lit with heavy bounce can look detached if the background stays much darker, and a face left too dark can disappear if the background is bright sky or reflective pavement. The cleanest approach is usually to let the background establish the scene, then lift the subject only until the eye can read expression comfortably.
That also means fill should usually be directional. A reflector placed too close to the camera axis can flatten features and eliminate cheek and nose shadow. Moving the bounce a little off to one side keeps the face dimensional while still controlling contrast.
Protect continuity
The sun’s changing direction can make adjacent shots feel as though they were filmed at different times. Group angles by the light they need, note the sun and shadow direction for each setup, and be ready to rotate camera positions or return to an angle later. For two actors facing each other, matching the quality of light across their close-ups may matter more visually than insisting the sun be in one physically exact position for every shot. 1
If you diffuse a close-up, inspect the whole image before rolling: a softly lit actor against a bright, hard-sun background can reveal the lighting intervention. Likewise, when clouds repeatedly cover and uncover the sun, decide whether to wait for one condition rather than cutting between visibly different looks. 1, 2
Keep the daylight story consistent
Continuity in exterior daylight is not only about shadow direction. It also includes contrast ratio, eye light, background tone, and whether the scene feels like it lives in sun, shade, or mixed light. A scene can technically match from one shot to the next and still feel wrong if one angle reads as hard noon sun and the next reads as late-afternoon open shade.
For that reason, the best continuity notes on a daylight day are visual: which side the sun is on, how long the shadows are, whether the background is warm or cool, and whether the actor’s face has a crisp edge or a softened wrap. Those details help preserve the same atmosphere across coverage even when the light itself is moving.
Common mistakes
- Lighting the face without checking the background. A clean close-up can still cut poorly if the background becomes too bright, too empty, or too obviously different from the rest of the scene.
- Over-filling the subject. Too much bounce turns exterior daylight into a front-lit interview look and removes the shape that sunlight gives the face.
- Using diffusion as a cure-all. Diffusion softens hard sun, but it can also lower contrast and make the subject feel weaker against the location if the surrounding frame stays unchanged.
- Ignoring the sun’s movement. A setup that works for ten minutes may not work for the next shot if the sun has shifted enough to change the key side, background tone, or shadow pattern.
A practical exterior daylight workflow
- Choose the light direction first. Decide whether the scene wants front light, side light, or backlight.
- Place actors in the best natural shade or sun. Move people before moving gear.
- Lock the camera angle. Find the framing that protects the background and keeps the sun out of trouble.
- Add the smallest possible correction. Use bounce for lift, diffusion for hardness, or negative fill for shape.
- Check the whole frame. Confirm that the face, background, and shadow direction all belong to the same lighting idea.
- Repeat the setup consistently. If a cloud passes or the sun shifts, reset to the original visual relationship before moving on.
Exterior daylight is rarely about making the sun disappear. It is about deciding what the sun should do in the story, then using simple tools to keep that choice stable enough to cut together.