
Mastering Practical Lighting: Transform Your Scenes with Real-World Illumination
Image source: What is Practical Lighting in Film? Tips and Techniques Explained
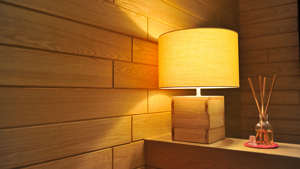
Image source: Keep Other Sources Off The…
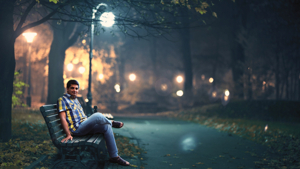
Image source: Consider The Angle
Practical lights are visible light sources inside the frame, like lamps, bulbs, signs, candles, or screens, and they work best when they feel like part of the scene’s natural logic rather than added decoration. Use them to motivate the mood, justify your key light, and add depth or separation so the image feels intentional and believable. 1, 2, 3, 4
How to place them
Start by deciding what the practical is doing in the scene: is it the apparent source of light, a background accent, or a story point the actor interacts with ? Place it where it makes sense in the environment and where it helps shape faces, shadows, and composition instead of flattening the image. 3, 4, 5, 1
A practical should usually do at least one of three jobs: motivate the exposure on a face, define the edge of a space, or create a believable pool of light that organizes the frame. A lamp beside a sofa can justify a soft key from camera side, while a neon sign in the background can add color separation without needing to illuminate the actor directly. In both cases, the placement matters as much as the fixture itself, because the audience reads direction, distance, and intensity from where the light sits in the room.
When choosing placement, think like a blocking diagram rather than a prop department list. A lamp on a bedside table reads differently from the same lamp on a dresser across the room, because the falloff, shadow direction, and eye-line relationship all change. Practicals near a subject also tend to create stronger depth cues: foreground darkness, midground illumination, and background points of color make the frame feel dimensional.
A simple workflow is:
flowchart TDA[Choose the scene's motivation] --> B[Place the practical where it belongs in the world]B --> C[Match color and brightness to the mood]C --> D[Hide or add film lights to support the practical]D --> E[Shape depth, contrast, and actor movement]Make it believable
Match the practical’s color temperature to the rest of the lighting, or let it contrast deliberately if you want a stronger mood shift. Dim, diffuse, or gel it when needed so it reads as a real source instead of an overpowering prop. If the practical is in frame but not bright enough to light the subject, add a hidden off-camera source that feels like it is coming from that practical. 5, 6, 3
Believability depends on exposure and behavior as much as on color. A 60W-looking lamp bulb that blasts the frame at full output can feel wrong unless the style is intentionally heightened. Real practicals usually have limited output, visible falloff, and a specific beam shape from shade, glass, or filament design. Matching those qualities with the camera setup keeps the source credible even when the real illumination is coming from a larger hidden fixture.
Color should follow the emotional logic of the scene. Tungsten-style practicals often read as warm and intimate, especially in interiors at night, while cooler sources such as fluorescent tubes, TV screens, and some LEDs suggest distance, clinical spaces, or urban environments. Deliberate contrast can be effective, but only when one color family is clearly dominant and the other is used as an accent rather than a competing wash.
The hidden support light should usually echo the practical’s direction rather than fight it. If a lamp sits on the left side of frame, the off-camera key should feel as if it is spilling from that side, with the strongest highlight and shadow structure aligned accordingly. This keeps the viewer from noticing that the practical itself is too small or too weak to do the heavy lifting.
Use it for story
Practical lights can tell the audience where to look, support a character beat, or signal tension and intimacy. Multiple practicals, such as table lamps, string lights, or hanging bulbs, can create layered depth and visual interest in the background. A single lamp can also become a strong visual anchor if you keep the rest of the frame simpler. 6, 1, 3
The story function of a practical often changes with the scene’s emotional temperature. In a quiet dialogue scene, one lamp can isolate the characters in a controlled pool of light and make the space feel private. In a suspense setup, practicals can leave portions of the frame underlit, creating partial visibility that feels uneasy without becoming unreadable. In a comedic or casual scene, brighter practicals and evenly spaced background points can make the environment feel open and active.
Practicals also help with actor movement and blocking. A character turning on a bedside lamp, passing under a hallway sconce, or leaning into the light from a desk fixture creates natural transitions in exposure and attention. Those transitions give the camera a reason to move, reframe, or hold. A practical is most effective when it gives the scene a visual event, not just an ambient glow.
For background design, repetition matters. A row of small bulbs, bar signs, city windows, or candle flames can produce rhythm across the frame, while a single standout source can function as a visual punctuation mark. In either case, the practical should support the scene’s hierarchy: the actor remains the primary read, the motivated light supports the actor, and the background practicals build atmosphere around them.
Common mistakes
Avoid letting the practical become the only source of light unless that is clearly the creative goal, because it can leave faces underexposed or awkwardly lit. Don’t place practicals where they look random or physically impossible, since that breaks the scene’s logic. Also avoid mixing colors without intention; inconsistent warm and cool sources can look messy unless you are using the contrast on purpose. 2, 1, 5, 6
Another common problem is scale mismatch. A tiny bulb close to camera can dominate the frame if it is overexposed, while a large lamp shade may appear weak if it is not given enough visible output or surrounding ambient support. The size of the fixture, the brightness of the source, and the amount of spill on nearby surfaces all need to agree.
Overmatching is also a risk. If every practical is equally bright and equally crisp, the scene can lose depth and visual hierarchy. Real rooms usually have a mix of emphasized and subdued sources, and cinematography benefits from the same imbalance. A few well-placed practicals with different intensities usually work better than a room full of equally bright fixtures.
Finally, remember that practicals can expose production seams. Reflections in mirrors, shiny tables, windows, and eyeglasses may reveal the hidden support light or the wrong angle of the fixture. Planning the practical with reflective surfaces in mind prevents the scene from collapsing once the camera moves.
Quick example
For a night interior, put a table lamp in frame near the actor, dim it slightly, and add a soft off-camera key from the lamp side so the audience believes the lamp is lighting the room. Then use a second small practical in the background to create depth and keep the frame from feeling empty. 1, 5, 6
A useful variation is to let the lamp define the emotional tone while a cooler secondary source separates the subject from the wall. The lamp can stay warm and domestic, while a faint window or hallway source adds edge contrast and stops the image from becoming monochromatic. That combination keeps the scene grounded in the room’s logic while still allowing the camera to shape the portrait.
Practical lighting checklist
- Decide whether the practical is motivated light, background texture, or a story prop.
- Place it where the room would realistically contain it.
- Match its color to the scene’s emotional palette.
- Add hidden support lighting when the practical cannot carry the exposure alone.
- Check reflections, shadows, and lens flare before locking the setup.
- Use contrast and repetition to guide attention instead of filling every corner equally.
Practical lighting works because it makes illumination look discovered rather than manufactured. When the visible source, the hidden support, and the scene blocking all agree, the frame feels grounded, cinematic, and easy to believe.