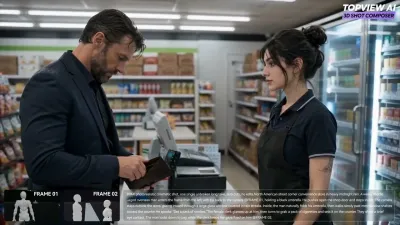
3D Previs for Camera Moves: Plan Tracking Shots, Rigs and Blocking Before the Shoot
Image source: Previz Software for Camera Work: Block Shots in 3D - topview.ai
Testing camera moves in 3D previs before the shoot
3D previs lets a crew rehearse a camera move against a rough, scaled version of the set and action before committing to rigging, lighting, or a company move. Its most useful output is not a polished animation; it is a shot whose framing, timing, physical path, and production requirements the director and crew can discuss together. Technical previs can carry that plan into real-world dimensions and camera information. 1
A practical test sequence
-
Build only what affects the shot. Start with a floor plan, survey, or measured set model. Include walls, doorways, furniture, and obstacles that could constrain the camera or appear in frame; rough stand-ins are enough for performers. Block the action and its key story beats before refining the camera. 1 In practice, the scene should be simplified to the geometry that changes the move: a doorway that narrows the path, a table that forces a lower lens height, a stair landing that changes eyeline, or a mirror that introduces an unwanted reflection.
-
Match the intended camera. Set the delivery aspect ratio, sensor or filmback size, focal length, and approximate camera height. Test the focal lengths that could actually be used on the shoot; changing filmback or lens settings changes what the virtual viewfinder shows. 2 A 24 mm lens and a 50 mm lens may both “fit” the action, but they produce different parallax, different background compression, and different allowances for crew movement beside the camera.
-
Find the frames before animating the move. Compose a start frame and end frame, then identify what the move must reveal, follow, or conceal between them. Check whether a locked-off shot could do the job—the ease of moving a virtual camera is not, by itself, a reason to move it. 1 Many camera moves exist only to solve a story problem: hide a cut, reveal a character, maintain energy through a long beat, or create a transition from one part of a location to another.
-
Animate and rehearse at plausible speed. Add the camera path and performer timing, then watch from both the camera view and overhead. Check framing throughout, not just at the endpoints: watch for blocked sightlines, awkward pans, unwanted reveals, and a path that conflicts with the set or action. Test a slower or simpler alternative. 1 A move that feels elegant in isolation can fail when a performer stops early, turns late, or occupies the space where the camera was supposed to land.
-
Cut the shot into the sequence. A move that looks strong alone may interrupt the rhythm or fail to connect with the preceding shot. Review the previs as an edit, revise, and pass the chosen version to the relevant crew with its camera path and assumptions. 1 The value of previs increases when the shot is judged in sequence order, because lensing and blocking choices often need to support the cut, not just the individual move.
flowchart LR A["Measured space and story beats"] --> B["Block performers"] B --> C["Set camera and lens"] C --> D["Test framing and movement"] D --> E["Review in the edit"] E --> F["Agree on shoot plan"] D -->|Revise path, timing, or staging| BBlocking, lensing, and real-world constraints
Camera previs is strongest when it treats blocking and camera motion as one system. A move that follows a performer down a hallway, for example, is not only about the path of the camera; it also depends on where the performer begins, how quickly they cross the frame, where they pause, and whether the camera must lead or trail the action. If blocking changes, the lens choice may change with it, because a tighter focal length can tolerate less lateral drift and exposes more of the background’s speed through parallax.
Lens choice should also be tied to practical setup. A wide lens may make the move feel easier because it hides small operator errors, but it also exaggerates nearby set edges and can make lighting instruments or rigging harder to conceal. A longer lens can simplify background composition, but it reduces depth of field and makes small bumps in the camera path more visible. In previs, those trade-offs can be tested before the crew commits to a dolly length, gimbal configuration, crane arm, or handheld approach.
This is also where virtual camera tools are useful in a broader previs workflow. Camera settings such as lens, filmback, and framing should be documented alongside blocking so the move can be reconstructed or adjusted later without guessing. When the shot plan is shared with camera, grip, and art departments, it becomes easier to compare the intended move against the actual space and the available equipment.
Location scout to shot plan
A measured previs pass is especially valuable during location scouting. A hallway, stairwell, doorway, or exterior path can look generous in person and still collapse once the camera, operator, support gear, and performers occupy the same space. A rough digital layout makes it possible to test the move before the crew commits to a specific day, and it can expose problems that are easy to miss on a walk-through: a turn too tight for a dolly, a doorway too narrow for a stabilized rig, or a ceiling too low for a raised eyeline.
The same process helps when comparing multiple camera strategies for the same beat. A push-in can create intimacy, a lateral track can keep the environment alive, and a reveal move can reshape the scene’s emphasis. Previs clarifies which version supports the scene best, then shows whether the chosen path is actually possible inside the location geometry. For independent productions, that makes previs less about spectacle and more about avoiding wasted setup time.
What to take to set
Export a short previs clip alongside an overhead path diagram and a shot note: intended lens and format, start and end marks, performer positions, approximate move duration, and any clearance or equipment assumptions. Treat those as a plan to verify, not a promise that the physical move will match the animation exactly; real camera movement can differ from previs. A measured technical pass is especially valuable when a move depends on tight clearances or specialist equipment. 1
For example, if the camera must follow someone through a doorway and then reveal another character, previs can show whether the reveal happens at the right moment and whether the camera path appears to pass through the door frame. Solve either problem digitally first, then confirm the dimensions and move with the crew at the location. 1
A good shot note is compact but specific. It should tell the operator where the move starts, where it ends, how much space is needed around the camera, and whether the camera height or lens is part of the storytelling. That makes the previs useful for grip, camera, art, and editorial decisions alike, because the same document describes both the image and the physical work required to make it.
Common mistakes in 3D previs
- Animating before blocking. Camera movement often gets overworked when the performer positions are still vague. The shot becomes clearer once the action is fixed first.
- Choosing a lens only by feel. A lens that looks “cinematic” in previs may be unusable on the day because it changes the amount of visible set edge, crew cover, or focus tolerance.
- Ignoring the edit. A beautiful move can still be wrong if it steals attention from the preceding shot or delays the next beat.
- Treating the virtual move as exact. Previs is a rehearsal, not a guarantee. Physical rigging, floor slope, lens breathing, and operator stance can change the final result.
- Forgetting support gear. The camera may fit the path while the dolly, tripod, gimbal, or operator does not.
Why previs pays off
3D previs reduces camera moves to their essential variables: space, timing, lensing, and story function. That makes it especially useful for tracking shots, reveals, and moves that need to hit marks with precision. Instead of discovering a problem on set after lights are built and talent is waiting, the crew can test the idea in a controlled digital pass, choose the cleanest version, and arrive on the day with a shot plan that has already been challenged from multiple angles.
For filmmakers working with tight schedules, that is often the real advantage: fewer surprises, cleaner blocking, and a camera move that has already been judged against the room it has to live in.
References
-
[PDF] Previsualization: assisting filmmakers in realizing their vision
-
Unreal VCam Virtual Camera Settings | Unreal Engine 5.6 Documentation | Epic Developer Community